
New to Pipedrive?
 Claim Your 30-day Free Trial!
When it comes to improving your sales process, automation can be a game-changer. In Pipedrive, activity-based automation is one of the most powerful ways you can make sure no Deal slips through the cracks. This article will guide you through how to set up a solid cold-outreach flow using Pipedrive's built-in workflow automations. By the end, you'll know how to automatically have activities created for the right task at the right time to be completed by the right person — all of which will keep the sales flowing in!
There are a couple of different ways to automate tasks in Pipedrive, but for this example, we'll focus on using Pipedrive's native Workflow Automation tools. While third-party tools like Zapier and Make (formerly Integromat) are great for more advanced functions, Pipedrive's built-in automations can handle a lot of essentials. As a Zapier Expert, I do use Zapier quite a bit when building on behalf of my clients, and I have several Zapier tutorials on my YouTube channel. However, if you're new to automations or don't want to incorporate a third-party tool, this article is going to be the perfect starting point for you.
Here's what we'll cover:
- How do automations in Pipedrive work?
- Automatically create an Activity when a new deal is added to Pipedrive
- Automatically create a follow-up activity using Workflow Automation after a set period of time has passed
- Testing your Workflow Automations
This article is a step-by-step description of the demos contained in the video below. So, if you're a reader, read on. If you're a watcher, press play and follow along!
How do automations in Pipedrive work?
All automations, whether in Pipedrive Workflow Automation or Zapier, will contain one trigger and at least one action step (though they could have many action steps). In addition, the automation may also include other steps such as conditions (think of these like filters — only continue if X is true) and delays.
Triggers are events that start an automation. In Pipedrive, you can trigger an automation using a Deal/Lead, Person, Organization, Activity, or Project (and now, date fields as well). For example, you could start your automation when:
- A Deal is created
- A Deal is updated
- An Activity is created or updated (and that update could be "is done," which translates to triggering when an activity is completed)
- A Person (contact) is added or updated
Actions are the tasks that you want Pipedrive to perform for you automatically once the trigger event occurs. Common actions include:
- Creating an activity
- Updating a Deal (stage, status, or detail field) or Person
- Sending an email
- Creating a note
So, using just these two components, a basic but powerful automation could be: When a new deal is created, create an activity.
Conditions are criteria that must be met for the automation to continue. They make sure that actions only happen under specific circumstances. Examples include:
- The Deal value is greater than a certain amount
- The Deal stage is a particular stage, or a specific detail field was updated
- The Activity is a specific subject
This is particularly important when your trigger is that the entity (Deal, Activity, Person) is updated. If, for example, you have the automation When a Deal is updated, create an activity, you will be creating hundreds of activities. More likely what you wanted was When a Deal is updated AND the Deal Stage has changed to a specific stage, create an activity.
Delays introduce a pause in the automation workflow, allowing actions to occur after a certain period. Delays can be configured to:
- Wait for a specified number of minutes, hours, or days
- Skip weekends (always recommended if your sales team doesn't work weekends)
Including a delay in our example could look like: When a new deal is created with a Deal Value greater than $10,000, delay 1 day skipping weekends, and create an activity.
Now, let's build one from scratch!
When a new deal is added to Pipedrive, create an activity via workflow automation
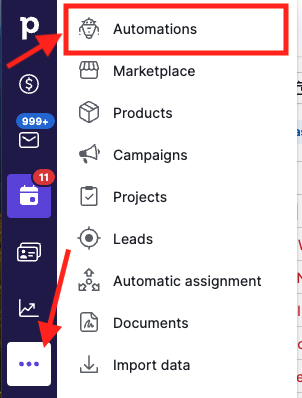
First, navigate to Automations in Pipedrive. You'll find this in your left-hand sidebar, most likely by clicking on the three dots at the bottom for "More."
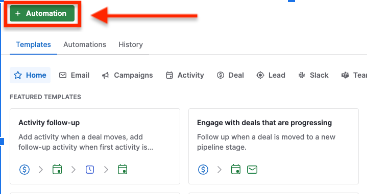
Once there, you'll find that Pipedrive has included quite a few templates for common scenarios. It doesn't hurt to play around with these to get familiar with how automations work. For now though, click on "+ Automation."
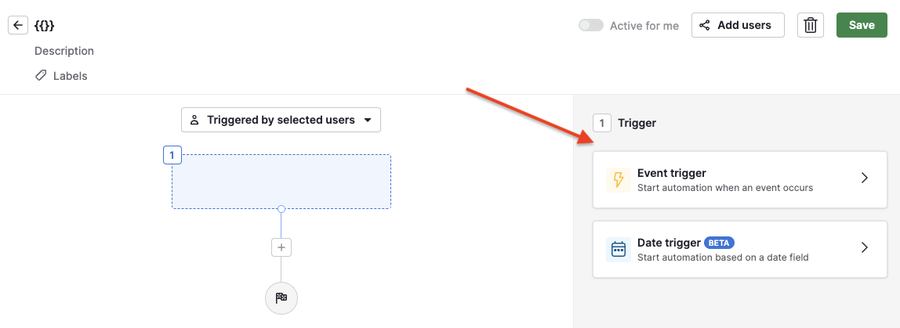
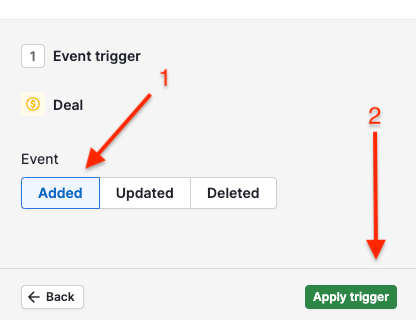
Choose your Event Trigger as "Deal" and then select "Added." This is our "when a new deal is added…" trigger.
Then, click "Apply Trigger."
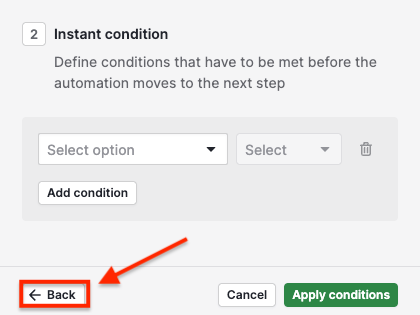
Once you apply the trigger, it's going to default your next step to be a condition step! But in many cases you may not need a condition. So, click "Back" and then "Action."
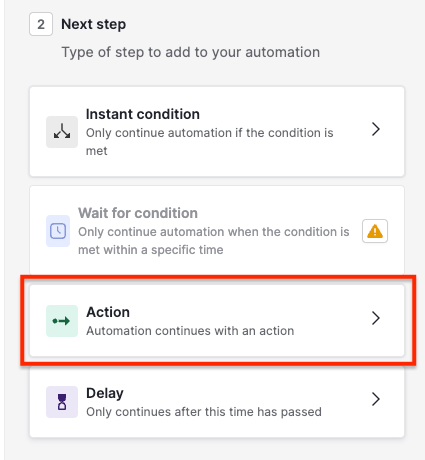
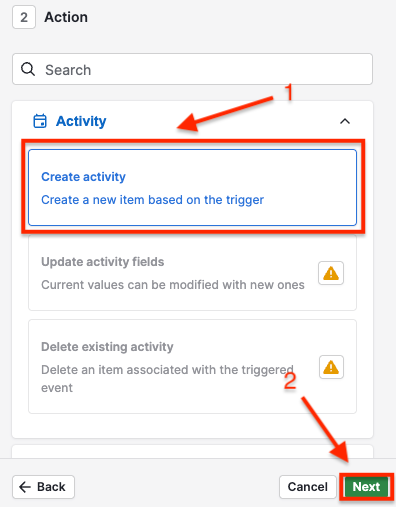
Now, we want our action to be to create an Activity. So, choose "Activity," then "Create activity," then "Next."
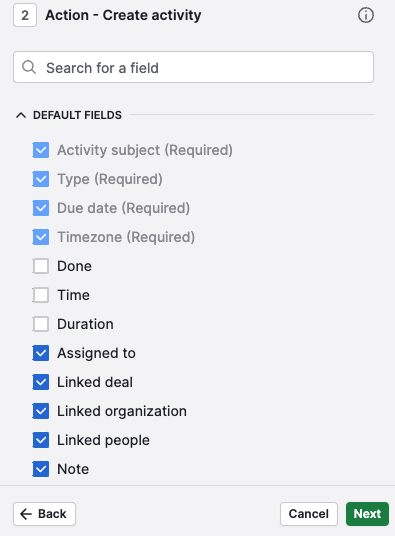
Here we can get really detailed and include a lot of useful information when this activity is created. You'll be presented with a list of fields to include. The following fields are required and will be selected by default:
- Activity Subject (required)
- Type (required)
- Due Date (required)
- Time Zone (required)
Then, in addition, I recommend selecting:
- Assigned to
- Linked Deal
- Linked Organization
- Linked Person
- Note
Once you select all of those fields, click "Next" in the bottom right corner.
Now, you can fill in all of the fields you selected.
When choosing the Activity Subject, I like to use a standard numbering and naming system. This keeps everything organized and helps team members know what to prioritize at a glance.
You can also use a custom Activity Type. In this example, I am using a Cold Outreach activity type. If you want to track the volume of activities being completed by users, using a custom Activity Type will enable you to do that in Insights.
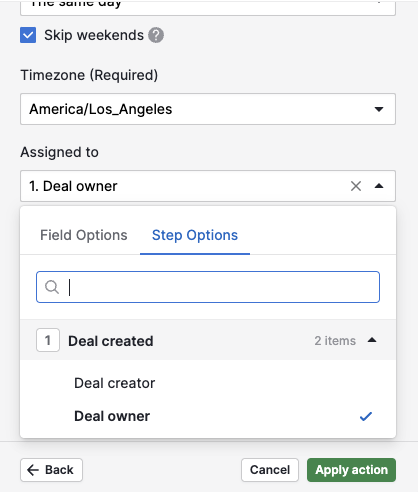
Typically "Assigned to" is the Deal Owner, so that activities are assigned to whoever owns the deal. This scales really well because if you add or remove users from Pipedrive, you don't have to update your automations. Sometimes there is a specific person who handles specific types of activities (for example, creating Proposals). In that case you might choose to assign the activity to a specific person.
The Notes section of Activities is a very powerful tool. Within it you can provide detailed, step-by-step instructions for the sales rep. This ensures consistency and makes it really easy to train new hires, because each Activity walks them through the call to make with the call-to-action, the template email to send depending on the call outcome, and so on.
For example, your activity notes may look something like:
- Call contact to schedule a Demo
- If you connect, do this.
- If you do not connect, do that.
- Mark this activity as done.
Then I also like to include a note about how automation will take hold of the Deal from here. For example: 3 days after marking this activity as done, if the deal is still open and in this stage, an additional activity will be created for you.
Including a note regarding the next step is helpful in freeing up brain space and letting the sales rep know they don't have to think about this again because a new activity will be made for them.
Once all of your fields are complete, in the bottom right corner, click the green "Apply Action" button.
Now, to activate your automation:
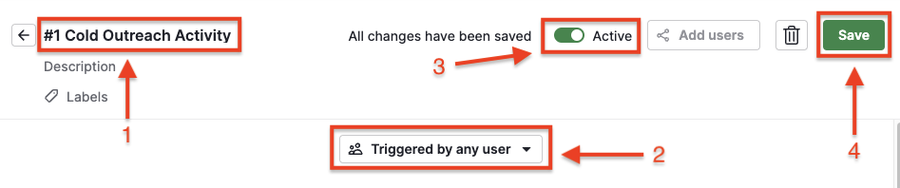
- Name your automation (e.g. Deal Created → Create #1 Cold Outreach Activity).
- Select that the automation is "Triggered by any user" (this means that regardless of who creates the Deal, your automation will trigger).
- Activate it by clicking "Active."
- Click "Save."
🎉 Congratulations! You've successfully created and activated your first Workflow Automation! 🎉
Create a follow-up activity via workflow automation
Now let's move on to something a little more advanced. In the automation we just created, we told the user 3 days after marking this activity as done, if the deal is still open and in this stage, an additional activity will be created for you.
Now, let's create the automation for that activity. I'm only going to include screenshots for new steps we didn't do in our initial automation.
- Go back to Automations and click "Add a new automation."
- Choose "Activity" as the item to trigger the automation.
- Select "Updated" and "Apply Trigger."
- You'll then be taken to the "Instant Condition" screen, and here you want to add one! Select "Activity Subject" is "#1 Cold Outreach" and add an AND condition that the "Activity Status" has changed to "Done."
- Click "Apply Conditions" in the bottom right-hand corner.
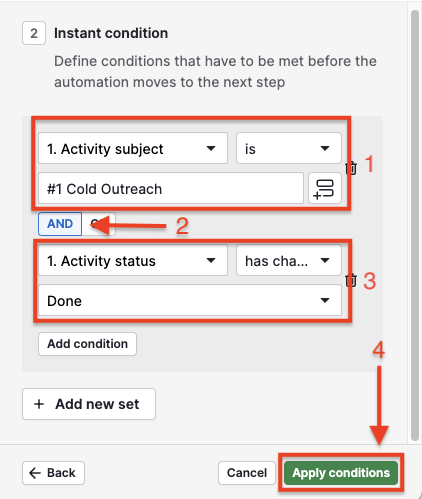
This automation will trigger when the #1 Cold Outreach activity has been marked as done. But we told the sales rep that another activity would only be created if the Deal is still Open and in this same Stage in 3 days. So now, we need to add a Delay step.
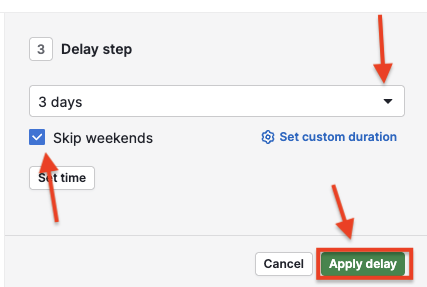
To add the next step, click on the green + sign after step 2 and select "Delay." You can select from specific options in the dropdown menu (e.g. 1 day, 3 days, 5 days), or click the blue text to set a custom duration (e.g. 4 days, 2 weeks). For this automation, we will select 3 days in the dropdown and check the box to "Skip weekends," which means that if day 3 is a Saturday or Sunday, the delay will last until Monday. The "Skip weekends" checkbox is useful if your team is not working on the weekends because it'll ensure activities aren't created over the weekend and overdue by the time your team comes in on Monday.
Finally, click "Apply Delay" in the bottom right corner.
Now we need to add one more condition that tells the automation to continue only if the Deal is still Open and in the same Stage.
- Click on the green + sign under step 3 of the automation and then select "Instant Condition."
- The first condition will be "Activity deal stage" (from step 1) is "New Deal."
- AND the second condition will be "Activity deal status" (from step 1) is "Open."
- Click "Apply Conditions."
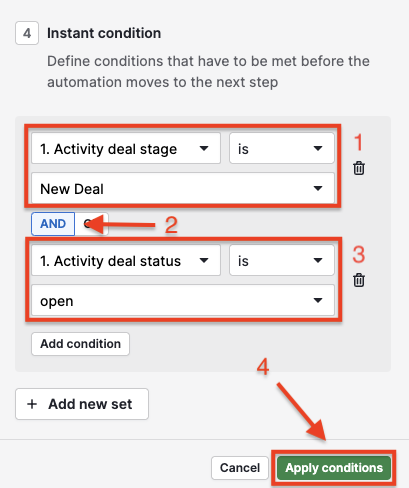
The very last step of this automation will be your Action step to create the 2nd activity.
- Click on the green + sign under step 4.
- Click "Action," then "Activity," then "Create activity," and "Next."
- Select and fill in all of the relevant fields.
- Complete the fields you've selected and click "Apply Action."
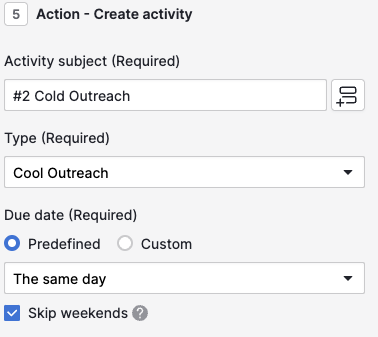
Finally, as before, now you're ready to activate your automation.
- Name your automation (e.g. #2 Cold Outreach Activity).
- Select that the automation is "Triggered by any user."
- Activate it by toggling it to "Active."
- Click "Save."
And voila, just like that you're done!
You now have two automations that will ensure all Deals receive at least two touchpoints. Extra credit if you duplicate the second automation and update it to create a 3rd and 4th touchpoint 😁
How to test your workflow automation
It's always a good idea to test automations to make sure they're working as you intended before you walk away. Because of the delay step in our second automation, this can be a bit tricky, but what I recommend doing is just changing the timeframe of that delay step (e.g. to 1 minute) for your test and then updating it back to the actual timeframe you want once you've completed testing.
Not sure what I mean? Watch this clip where I show you how to test these automations:
Conclusion
Activity-based automation in Pipedrive's Workflow Automation creates a strong foundation for a consistent, efficient, and effective sales process. These automations save your team loads of time and help keep them focused on the most important tasks, giving you a strategic advantage over the other guys.
As you get more comfortable with Pipedrive's automation tools, you can customize and expand your workflows and develop ever-more-complex scenarios. And of course, I'm here to help. Happy automating!
Want a hand automating Pipedrive?
Book a working session and we'll build automations tailored to your sales process.
Book a Working SessionNeed help setting up Pipedrive and optimizing it for your business?
Let's Connect!